As a Frontend Developer by trade, I take lots and lots of screenshots. Windows and MacOS both have several good options for taking screenshots. The one I like a lot on my Mac is Monosnap but they did not have a solution for Linux until recently. Now they have a browser addon that does just about everything that the MacOS app does. One thing that is missing is the ability to call it up with a hotkey and while taking screenshots outside of the browser is possible, its not as seamless as the MacOS app is. That said, as a Frontend Developer, 99 percent of my screenshots are taken inside the browser anyway. I tried shutter which seems to be the current leader but it has some drawbacks. I finally discovered GIMP had a screenshot mechanism and I'm going to show you how to use it.
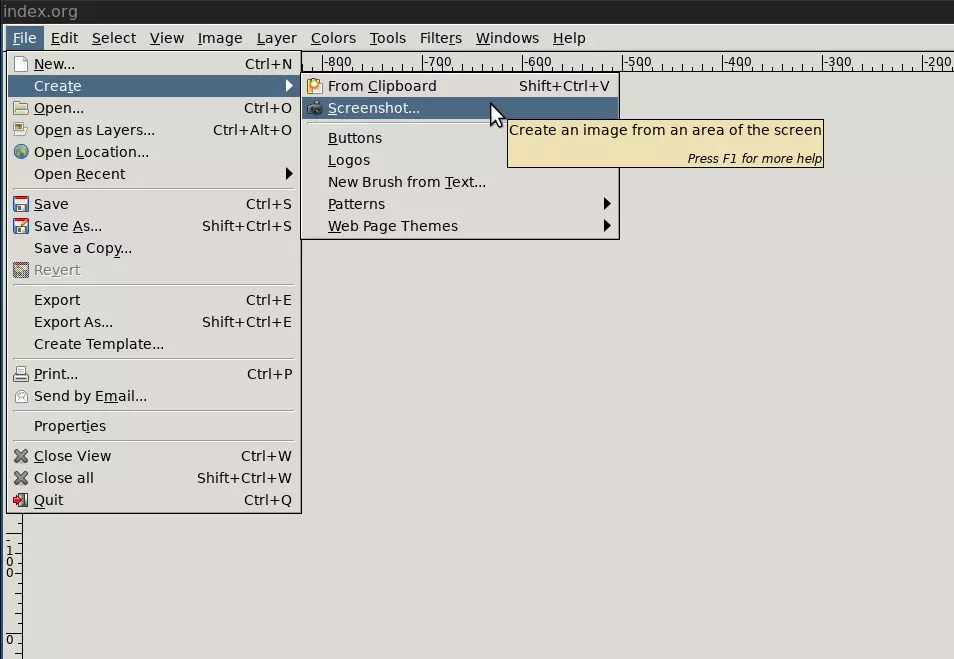
Because this post is about GIMP as a screenshot tool, we'll be using it (v2.8.22) for all the screenshots taken to support this article. GIMP stands for GNU Image Manipulation Program and when you think of gimp, you generally think about it as a tool for editing a screenshot or a photo , but it was not obvious to me that you could also use it to take the screenshot as well. This is where a tool like Shutter really shines, but it doesn't allow you to make any edits to the screenshot, you still need to open it up in GIMP for that, so why not just skip the middle man and take the screenshot as well? To take a screenshot in GIMP click the File menu, then Create, then Screenshot.
Once you have selected the screenshot tool you are presented with the following options.
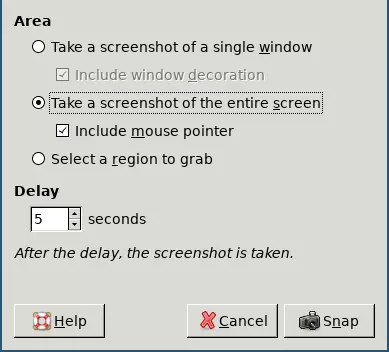
Take a screenshot of a single window: What this means is that you can simply click on any window you have open and it will take a screenshot of that entire window. If you place a checkbox in the "Include window decoration" Then it will include the toolbar, menu and such, otherwise it only grabs the contents of the window.
Take a screenshot of the entire screen: What this means is that when you click it will take a screenshot of your entire desktop. If you have the "Include mouse pointer" option checked it will also capture your mouse pointer in the screenshot.
Select a region to grab: This may be the most common option, at least it tends to be the one I use the most. This option allows to you to click and drag a rectangle around only the piece of the screen that you want to capture in your screenshot.
Delay: Normally you just click to capture the screenshot, but if you add a non-zero value for delay then after that time has expired the screenshot will be taken. This is useful if you want to take a screenshot of a menu option like I did for the "File -> Create -> Screenshot" image above.
Now that you have your screenshot captured, you might want to make some minor edits to it before you share it. Common things you might want to do would be:
- Draw a rectangle
- Draw ellipse
- Draw a line
- Draw an arrow
- Draw free-hand
- Erase
- Crop
- Add text
- Sharing your screenshots
I'm going to show you how to do each one of these, but you're certainly not limited here, you have the full power of GIMP at your disposal, these are just a few of the basics. If you want more, there is tons of information available on how to do just about anything you can think of.
Draw a rectangle
Drawing a rectangle is basically two steps, dragging a selection around where you would like the rectangle, then applying a stroke to the selection you created.
- Before you create your selection, make sure you choose what color you would like your rectangle. You choose your color by clicking on the Window menu, then Dockable Dialogs, then Colors.
- Once you have selected your color it's time to drag a selection around what you want your rectangle. Click the Tools menu, then Selection tools, then Rectangle select. Now you drag a rectangle around what you want to have a rectangle around.
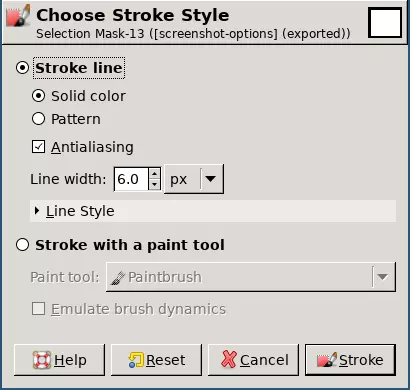
- Now that you have chosen your color, and drug your rectangle out, apply a stroke around the selection which will apply the color to the selected area which will create your rectangle. Click the Edit menu, then Stroke selection. You will be presented with a dialog rectangle containing some choices. I generally just take the defaults, but you can play around with your options until you find something that works for you. You might for example want a thicker or thinner rectangle, so adjust "Line width" up for a thicker rectangle, or down for a thinner rectangle. Once you are satisfied with your options click the Stroke button and should now have a rectangle around your selection with the color you chose.
Draw an ellipse
Drawing an ellipse is exactly the same as drawing a rectangle in every way with the exception of using the ellipse tool as opposed to the rectangle tool.
- Before you create your selection, make sure you choose what color you would like your ellipse. You choose your color by clicking on the Window menu, then Dockable Dialogs, then Colors.
- Once you have selected your color it's time to drag a selection around what you want your ellipse. Clicking the Tools menu then Selection tools, then Ellipse select. Now drag a ellipse around what you want to have an ellipse around.
- Now that you have chosen your color, and drug your ellipse out, apply a stroke around the selection which will apply the color to the selected area which will create your ellipse. Click the Edit menu, then Stroke selection. You will be presented with a dialog ellipse containing some choices. I generally just take the defaults, but you can play around with your options until you find something that works for you. You might for example want a thicker or thinner ellipse, so adjust "Line width" up for a thicker ellipse, or down for a thinner ellipse. Once you are satisfied with your options click the Stroke button and should now have an ellipse around your selection with the color you chose.
Draw a line
Drawing a line is slightly different than drawing a rectangle or ellipse. This time you have several tools you can choose from that all work very similar, the difference is the type of line you will end up with.
- Before you choose your tool, make sure you choose what color you would like your line. You choose your color by clicking on the Window menu, then Dockable Dialogs, then Colors.
- Once you have selected your color it's time to decide what type of line you want. Your tool choices are paintbrush, pencil, airbrush, or ink tool. You'll find these under the Tools menu, then Paint tools.
- Now that you have chosen your color, and decided what tool you will
use to draw your line you can either just drag it out free-hand, or
if you want a perfect line, click and quickly release where you
would like the line to start, hold down
<shift>then quickly click and release where you would like your line to end.
Draw an arrow
Drawing an arrow is considerably more involved because what you need doesn't come included in GIMP unless you would just like to try and free-hand one out. If you want something a little more professional looking you'll need an plug-in, and unfortunately GIMP used to host a registry that is now defunct. However not all is lost. They have kindly archived all of the plug-ins that were hosted under the old registry up to a GitHub repository. You can find the arrow plug-in you need here.
Install the plug-in
- Download the arrow plug-in
- In GIMP, click the Edit menu, then Preferences, then inside Preferences on the left-hand menu click Folders, then Plug-Ins. Take a note of the "Plug-In Folders", specifically the one in your "home" folder.
- Copy the arrow.scm file you downloaded to the plug-in folder located in your "home" directory, then restart GIMP.
Create an arrow
- Before you draw an arrow, make sure you choose what color you would like it to be. You choose your color by clicking on the Window menu, then Dockable Dialogs, then Colors.
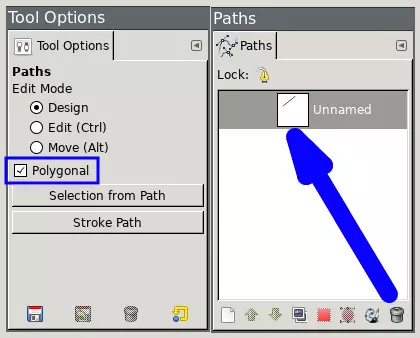
- Click the Windows menu then Dockable dialogs and open up both Tool options and Paths.
- Now select the Path tool by clicking the Tools menu then Paths.
- In the Tool Options dialog make sure Polygonal is selected.
- Now click the location where you would ultimately like the arrow pointing, then click where you would like the line to end.
- Now select the Arrow tool you installed earlier by clicking the Tools menu then Arrow.
You will be presented with a dialog of options you can use to manipulate the arrow that is drawn. I recommend you just try the defaults to see what you get, then play around with the options until you find something that works for you. I had you open the Paths dockable dialog in case you wanted to delete your arrow and start over. You can see a list of "paths" in the Paths dialog and can easily delete them from there.
![]()
The arrow tool will use the path you drew out to figure out where to put the arrow. The arrow will end up on the first point of the path that you click. The arrow tool will also apply a stroke along the path according to the color you selected.
Draw free-hand
Drawing free-hand is almost identical to drawing a line, the only difference is you don't hold down shift to get that perfectly straight line. I'm going to copy the directions here again for your convenience just in case you jumped to this area without reading about drawing a line.
- Before you choose your tool, make sure you choose what color you would like your line. You choose your color by clicking on the Window menu, then Dockable Dialogs, then Colors.
- Once you have selected your color it's time to decide what type of line you want. Your tool choices are paintbrush, pencil, airbrush, or ink tool. You'll find these under the Tools menu, then Paint tools.
- Now that you have chosen your color, and decided what tool you will use to draw with, you can just click and drag your mouse about until you get the shape you're looking for. Let go of the mouse button to stop drawing, click it again to draw again, etc...
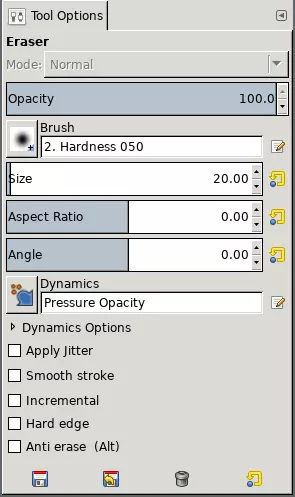
Erase
Erasing is very similar to free-hand drawing except instead of creating content, you are removing it, in a free-hand motion.
- Choose the erase tool by clicking the Tools menu, then choose Paint tools, then Eraser.
- Now just choose what you would like to erase by hold your mouse over it, click and drag until you have removed that content from your screenshot.
There are many options you can choose from to modify how the Erase tool works but the defaults work pretty well. Again experiment with them and decide what works best for you. And different options might work better for certain situations.
Crop
Cropping a screenshot is when you want to trim it down by drawing a selection rectangle inside of the screenshot around the area you want to keep. Anything outside the selection will be removed.
- Choose the Crop tool from the menu by clicking Tools, then Transform tools, then crop.
- Now draw a rectangle around the area you want to keep and hit enter.
It's that simple!
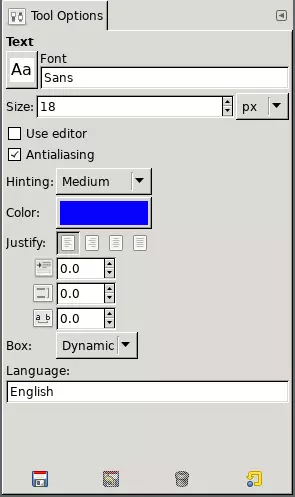
Add text
The final editing tool we are going to discuss is adding text. They say a picture is worth a 1000 words, but sometimes you still need a little text to augment it a bit.
- Choose the text tool by clicking the Tools menu, then choose Text.
- There are several options you can select from the Text Tool option dialog rectangle like the font, color, size, etc... so tweak all of those things until you have what you want, then click an area in the screenshot where you would like to place your text, then type it out. When you have completed typing out your text hit ESC. You might then want to choose the "move" tool to move it about slightly if it didn't end up quite where you wanted it. Click the Tools menu, then Transform tools, then Move if you would like to move it.
Sharing your screenshots
There is one thing missing from this workflow. You've figured out how to capture your screenshot and make the edits you need to, now its perfect and you want to share it with the world, how do you do that? This is another area where Shutter really stands out but I had problems with this as well. My problem was that I was trying to use S3 and it seemed to want to make my files private. At any rate, I'm sure it was probably something I had mis-configured but it led me to search for an alternative which is how I came to find GIMP but I still needed a way to share my creations. Enter imgur. I'm going to show you how you can use imgur to share images semi-privately in that anyone that has the link can get to it, but it won't show-up on the imgur timeline. This is only one option, I'm sure there are others.
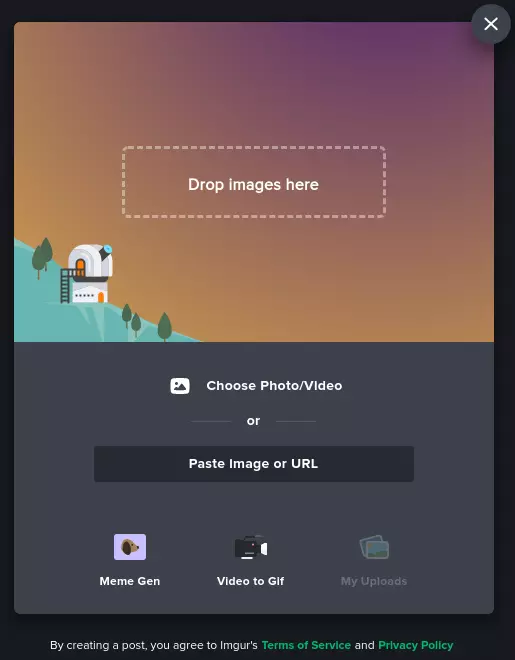
- Assuming you already have an account, login to imgur, if not you'll need to create one first.
- Locate the button labeled "New Post". As of today it is in the top left corner of on the home page, but I suppose they could move it at some point. Click the "choose photo" and find the screenshot you would like to upload and click submit.
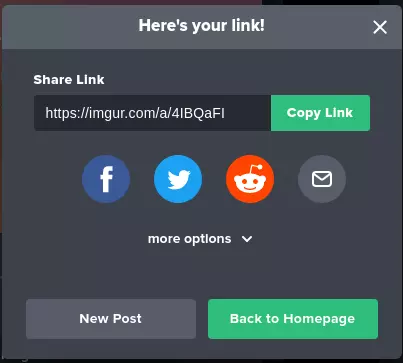
- And that's it, your image has been uploaded to what imgur refers to as a "post". You can add more than a single image to a post, but the post remains private until you click the "To Community" button. If you instead click the "Hidden" button, you will be presented with a dialog that will present to you a link that you can pass around to share this post of images with and it will not end up on the imgur feed. However do be aware that anyone who has this link can access the post.

And there you go, this is how I use GIMP as my screenshot tool. I would love to hear from you if you have other tools that you like, or if you have suggestions for improving this workflow.
Subscribe to the newsletter
Get notified when I publish new posts. No spam, unsubscribe anytime.
By subscribing, you agree to our privacy policy.